MySQL
From DreamHost
MySQL is a multiuser database server released under the GNU General Public License (GPL). MySQL is owned and sponsored by a single for-profit firm, the Swedish company MySQL AB.
All new databases created with DreamHost are using MySQL 5.0. Older, existing databases are still running MySQL 4.1 (for now.)
DreamHost uses phpMyAdmin, an open source tool written in PHP intended to handle the administration of MySQL over the Web.
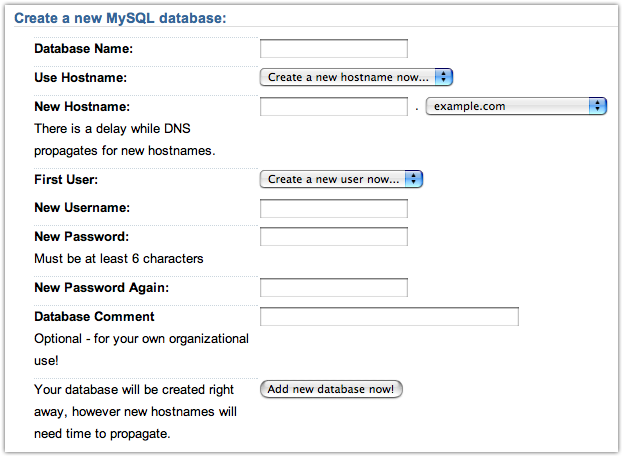
[edit] Creating a MySQL Database with DreamHost
| Log into the Account Control Panel, select the Goodies tab, and click on the MySQL link. |
At the bottom of the page there is a form where you can input the
information to create a new database.
|
| Click Add New Database Now! |
[edit] Connecting to Your Database
[edit] Connect to Your MySQL Database from Your Shell Account
| First, login to your DreamHost account: |
ssh -l yourlogin www.yourdomain.com
| Then, login to your MySQL database. You can copy/paste the exact syntax for your database in the Account Panel under "Goodies" / "MySQL." |
mysql -u yourdblogin -p -h yourdbdomain.yourdomain.com yourdb
| You can also include your password in the command (notice that there is no space after "-p"). |
mysql -u yourdblogin -pyourdbpassword -h yourdbdomain.yourdomain.com yourdb
You cannot use "localhost" to connect to your database, as DreamHost's MySQL servers are separate from the regular Web site servers.
[edit] Connect to Your MySQL Database from Third-Party Programs
To connect to your MySQL Database remotely, using a third-party program like MySQL Administrator, you must first grant your local machine rights to connect to the database server. This must be done for all MySQL user accounts you plan on logging in with from your local machine.
| Login to your Dreamhost Control Panel | |
| Select the Manage MySQL link under the Goodies section. | |
| Under the Database(s) on this server section, find the desired database and click the username you wish to grant access to. | |
| Under the section titled Allowable Hosts, type in the domain or subdomain your local machine identifies itself as on the public internet. Follow the formatting conventions described on the web page. You will need either your public IP address or your public originating domain/subdomain (like rr.com, mindspring.com, comcast.com, etc). |
To find your public IP address, go to What is My IP? (your IP is also displayed just below in the hosts input box after 'Your current computer is:'. Just cut and paste below the default). Note that enabling %.example.com does not enable the hostname example.com by itself.
| Click the Modify [username] now! button. | |
| Launch your third-party program, enter database and login information, and connect. |
Information on connecting using Microsoft Access specifically is here.
How to use Visual Basic to connect to MySQL
How a client side script can connect to MySQL - Ex. Java Applet
[edit] Connect to Your MySQL Database from Third-Party Programs via a Secure SSH Tunnel
[edit] Using Putty v0.60
Using PuTTy, it is possible to access your MySQL database via a secure SSH tunnel. This method is peferred over insecure methods as it provides point-to-point encryption and does not expose your MySQL account to potential hacks from allowed networks.
To set up a tunnel in PuTTy, your account must first have SSH enabled. To do this...
| go to your Dreamhost Account Control Panel | |
| edit the user to whom you wish to grant SSH access | |
| check the Enable ssh/telnet checkbox | |
| Make sure /bin/bash is your shell type | |
| click Save Changes |
Next, download and launch PuTTy.
| In the category tree on the left, click Tunnels near the bottom | |
| Enter 3306 in the source port | |
| Enter your mysql database address and port in the destination field (e.g. yourdbdomain.yourdomain.com:3306) | |
| Use all other defaults (local, auto) and click the Add button | |
| Click Session in the category tree | |
| Enter your shell account address in the Host Name field (e.g. foo.dreamhost.com | |
| Ensure that port 22 and SSH are specified under prototcol | |
| Give your session a name and click the Save button. | |
| Now log into your shell account using your newly created session | |
| Minimize the window |
Next, open the third-party tool. We'll use the MySQL Adminstrator tool as an example.
| enter localhost under Server Host (note: entering your actual address (e.g. yourdbdomain.yourdomain.com) will not work here. You must use localhost) | |
| enter 3306 as the port | |
| enter your db username and password | |
| click OK |
You should be in!
Notes:
| Your PuTTY session must be active and you must be logged in for the tunnel to be active | |
| If you are running a local MySQL db, you can specify a different port for your tunnel. Otherwise, you will not be able to access your local mysql connection while the tunnel is active. To do this: 1) specify a different number (e.g. 3307) in the source port field under Tunnels in PuTTY. 2) Use the same number as your port in the MySQL Adminstrator Port field. Note that your destination port must remain 3306. The idea is that you're sending data to port 3307 on your end, the data is sent through the tunnel, and then is shunted to port 3306 on Dreamhost's end. |
[edit] Using SSH
Set up the port forwarding once and for all in your ~/.ssh/config:
Host your_nickname_for_your_host
    HostName        your_dh_host_name.dreamhost.com
    User            your_shell_account_user_name
    LocalForward    3307 your_full_db_host_name:3306
To connect just use:
ssh your_nickname_for_your_host
mysql -h 127.0.0.1 -P 3307 -u db_user_name -p your_full_db_host_name
Or single command line:
ssh -4fNg -L 3307:your_full_db_host_name:3306 your_shell_account_user_name@your_dh_host_name.dreamhost.com
Then connect with mysql as above.
Gotchas:
Despite adding localhost as a valid host for your user in Goodies > Manage MySQL you may encounter this error message:
ERROR 1045 (28000): Access denied for user 'db_user_name'@'localhost' (using password: YES)
Use 127.0.0.1 instead of localhost (it's blocked by DH). (Thanks Shiva for the solution!)
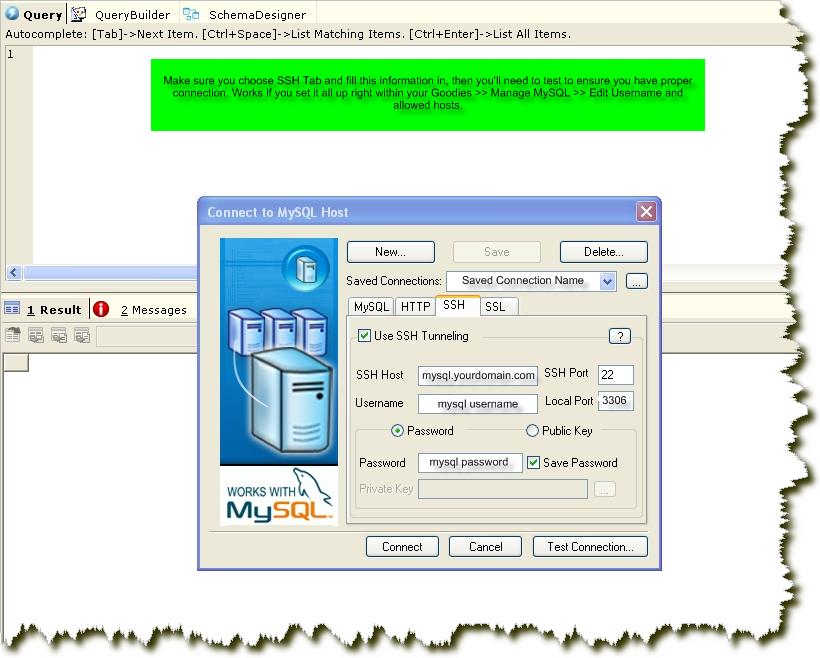
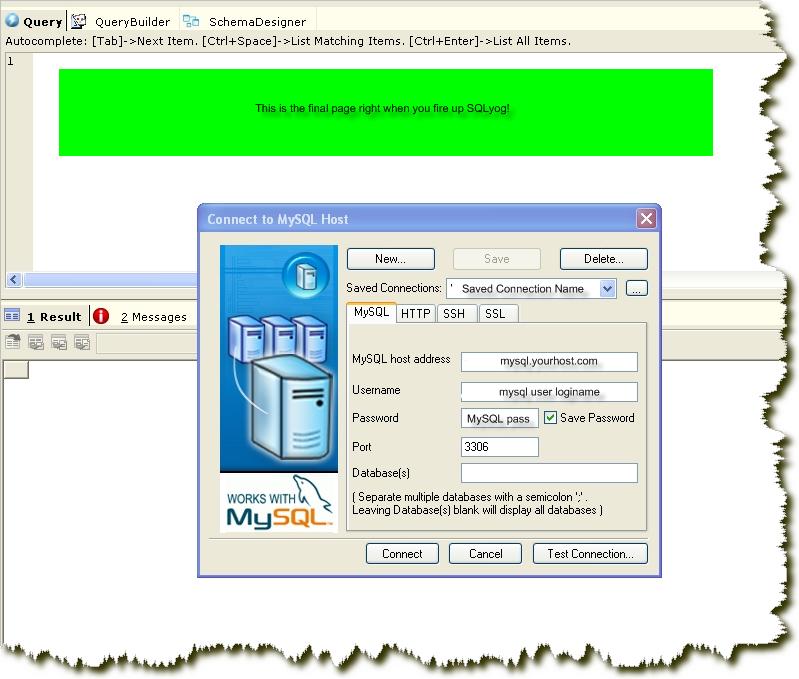
[edit] Using SQLyog
You may want to also check into the free version of SQLyog. The screenshots below show how easy it is to setup:
[edit] See Also
| Backup MySQL and Restore SQL backup | |
| Migrate MySQL databases from one host to another (or from one Database to another). | |
| MySQL and PHP | |
| Character sets in MySQL version 4.1 | |
| MyISAM versus InnoDB tables | |
| Upgrading from MySQL 4.1 to 5.0 - What might break | |
| DNS - Accessing your Database before DNS change |
[edit] MySQL Usage
You can monitor the usage on your account via the MySQL Usage section of the panel.
"Conueries" is a term used by DreamHost to measure MySQL database usage. The word is a combination of "connections" and "queries." Basically, the number of MySQL queries you have in a month, plus 25 times the number of connections you have is your total "conueries" for a month.
There are no longer any hard limits on conueries for any of DreamHost's plans. DreamHost reserve the right to have ultra-heavy users curtail their database usage (or switch to a dedicated server), but unless you've got a crazy (and crazily inefficient) database-driven site that gets thousands and thousands of visitors a day, don't sweat it!
[edit] MySQL limitations due to shared hosting
On Dreamhost shared accounts, some of the SQL commands listed in the MySQL documentation link below or in references such as the O'Reilly book Managing & Using MySQL by Reese, et al. are not available for scripting nor in phpMyAdmin.
Their functionality is available through the Dreamhost Control Panel described in the Creating a MySQL Database above.
Included are:
| create database (works from shell on databases created in panel) | |
| drop database (works from shell on databases created in panel) | |
| grant | |
| revoke |
[edit] Note on Dropping (Deleting) a Database
FYI, a database created on DreamHost is never fully dropped using the Control Panel -> Goodies -> Manage MySQL screen. If you login to the host with the appropriate credentials, via phpMyAdmin or the shell command line, you'll still find your database. Dreamhost does not completely delete the database as the result of a Control Panel action. Be careful!
If you no longer want a database you have set up on DreamHost, and you have any sensitive data in the database that you want to obliterate, you might consider dropping all the tables from the database so that the data can not be viewed in this manner.
[edit] External Links
| MySQL Documentation | |
| phpMyAdmin Home Page | |
| SQLyog |
Categories: Web | MySQL


